Developing MVC using Django and Visual Studio 2015 Part 1
Developing MVC using Django and Visual Studio 2015 Part 1
Introduction
Django is a free and open source web framework, written in Python. It follows the MVC pattern, and it is the most popular python web framework. Django provides all basic features that are part of a generic web application: authentication, security and data management.
The Django ORM
Django provides an ORM (Object-relational mappers) that is placed between your application and the data source. ORMs offer a high-level abstraction upon a relational database that allows a developer to write Python code to query an SQL database.
Django implementation of MVC pattern
There are three main component which are used by Django to describe the MVC pattern(the main thing to note here is the separation of concerns):
- models.py contains a description of the database table as a Python class. Using this class, you can create, retrieve, update, and delete records in your database using simple Python code rather than writing repetitive SQL statements;
- views.py contains the business logic for the page;
- urls.py specifies which view is called for a given URL pattern;
Django implementation of MVC pattern includes HTML templates (stored in templates folder of project) that render data to the user, this implementation type is called MVT (Model-View-Template).
Django in Visual studio 2015
Visual studio is the official Microsoft’s IDE: it is used to develop web applications on .NET environment; It also supports Python and it has different Django web application templates.
Firstly, to develop MVC web appplications using Django, you need to download Visual studio community 2015. You also need to some tools for python integration:
- PTVS: a visual studio plugin, that provides different tools for Python development, for example: intelliSense, remote debugging and profiling;
- Python interpreter: the interpreter that compiles your application;
You can download PTVS and Python interptreter here.
Project template in Visual studio 2015
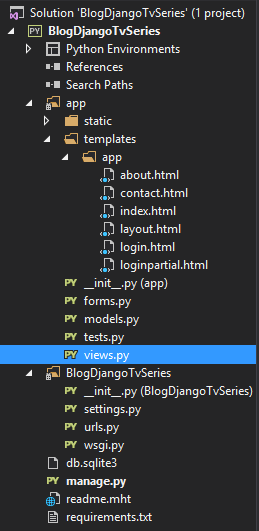
The image shows the typical project structure of a Django web application template created using Visual studio:
- Python environments: shows the different python enviroments which are used by the application;
- app/static: the folder contains all Javascript and Stylesheet files used by the application;
- app/templates: the folder contains the HTML files that are called by views.py files;
- forms.py: contains the definitions of applications form;
- models.py: contains the classes which define all models of application;
- test.py: contains definition of unit test of application;
- views.py: contains the methods that return all views;
- <project_name>\settings.py: defines some configurations used by the application, for example: database provider, database account;
- <project_name>\urls.py: defines all application paths using regular expressions;
- <project_name>\wsgi.py: contains the WSGI application used by Django’s development server
and any production WSGI deployments; - manage.py: a command-line utility that lets you interact with this Django project in various ways;
Model part
Setting up a database
Django supports a lot of databases, for example: postgreSQL, SQLite MySql, Oracle or Microsoft SQL Server. The default engine in Visual studio templates is SQLite: a simple database engine that is serverless and self-contained.
The settings.py file defines the connection string to the database:
the ENGINE field defines the database provider, the NAME field defines the path of database instance.
Defining a model class
Generally, each model maps to a single database table.
The basics:
- Each model is a Python class that subclasses django.db.models.Model;
- Each attribute of the model represents a database field;
- With all of this, Django gives you an automatically-generated database-access API, for more information click here;
The following code describes a simple definition of two models: Publisher and Book. Each model defines some fields, and Foreign Key.
Installing the model
Django default approach is Code first. It means that you need to write model definitions before convert them to SQL entities.
To generate SQL tables and entities from model.py you need to open the cmd window(Right click on project name – “Open command prompt here”) and type:
python manage.py makemigrations --name initial app
python manage.py migrate
Querying models
Once you’ve created your models, Django automatically gives you a database-abstraction API that lets you to perform all CRUD operations. You can use the Django shell (Right click on project >”Python” > “Open django shell”) to test the Publisher and Book models.
Firstly, lets add some data to database:
To filter and retrieve data you need to access to Entry.objects and use filter() method:
The field lookups are used to specify more condition to your QuerySet, all field lookups are specified here.
You can also use get() method to retrieve a single object . You can update an single field by setting a new value to the field Entity.fieldName="test"
To delete some records use the delete() method:
Conclusion
The post shows how to query and access data using Django framework, for more information about the django models and database click here.
You can find the project source on Github. The next post will explain the basics of routing and views system.