Developing artificial intelligence using .NET

Developing artificial intelligence using .NET

Microsoft has recently released two important AI services:

  • Microsoft Cognitive Services  are APIs which lets you tap into an ever-growing collection of powerful AI algorithms developed by experts in the fields of computer vision, speech, natural language processing, knowledge extraction and web search;
  • Bot framework is a very useful framework to build and connect intelligent bots to interact with your users naturally wherever they are, from Telegram to Skype, Slack, Facebook and other popular services;

This article discovers this services and shows how developing artificial intelligence using .NET.

Demo

The demo shows how to build a Bot that can automatically caption photos sent by users.

Requirements

  • Visual studio 2015 community edition , download here;
  • Bot conversation emulator, click here to download;
  • Microsoft cognitive services subscription, sign in here;
  • Visual studio Bot Framework .NET template, which can be downloaded here. To install, save the zip file to your Visual Studio 2015 templates directory which is traditionally in "%USERPROFILE%\Documents\Visual Studio 2015\Templates\ProjectTemplates\Visual C#\";

Setup the bot project

Create a new C# project using the new Bot Application template:

Developing artificial intelligence using .NET

Visual studio generates a new controller, by default, called MessageController, which is the main entry point of your bot:

using System;
using System.Linq;
using System.Net;
using System.Net.Http;
using System.Threading.Tasks;
using System.Web.Http;
using System.Web.Http.Description;
using Microsoft.Bot.Connector;
using Newtonsoft.Json;
namespace Bot_Application1
{
[BotAuthentication]
public class MessagesController : ApiController
{
/// <summary>
/// POST: api/Messages
/// Receive a message from a user and reply to it
/// </summary>
public async Task<HttpResponseMessage> Post([FromBody]Activity activity)
{
if (activity.Type == ActivityTypes.Message)
{
ConnectorClient connector = new ConnectorClient(new Uri(activity.ServiceUrl));
// calculate something for us to return
int length = (activity.Text ?? string.Empty).Length;
// return our reply to the user
Activity reply = activity.CreateReply($"You sent {activity.Text} which was {length} characters");
await connector.Conversations.ReplyToActivityAsync(reply);
}
else
{
HandleSystemMessage(activity);
}
var response = Request.CreateResponse(HttpStatusCode.OK);
return response;
}
private Activity HandleSystemMessage(Activity message)
{
if (message.Type == ActivityTypes.DeleteUserData)
{
// Implement user deletion here
// If we handle user deletion, return a real message
}
else if (message.Type == ActivityTypes.ConversationUpdate)
{
// Handle conversation state changes, like members being added and removed
// Use Activity.MembersAdded and Activity.MembersRemoved and Activity.Action for info
// Not available in all channels
}
else if (message.Type == ActivityTypes.ContactRelationUpdate)
{
// Handle add/remove from contact lists
// Activity.From + Activity.Action represent what happened
}
else if (message.Type == ActivityTypes.Typing)
{
// Handle knowing tha the user is typing
}
else if (message.Type == ActivityTypes.Ping)
{
}
return null;
}
}
}

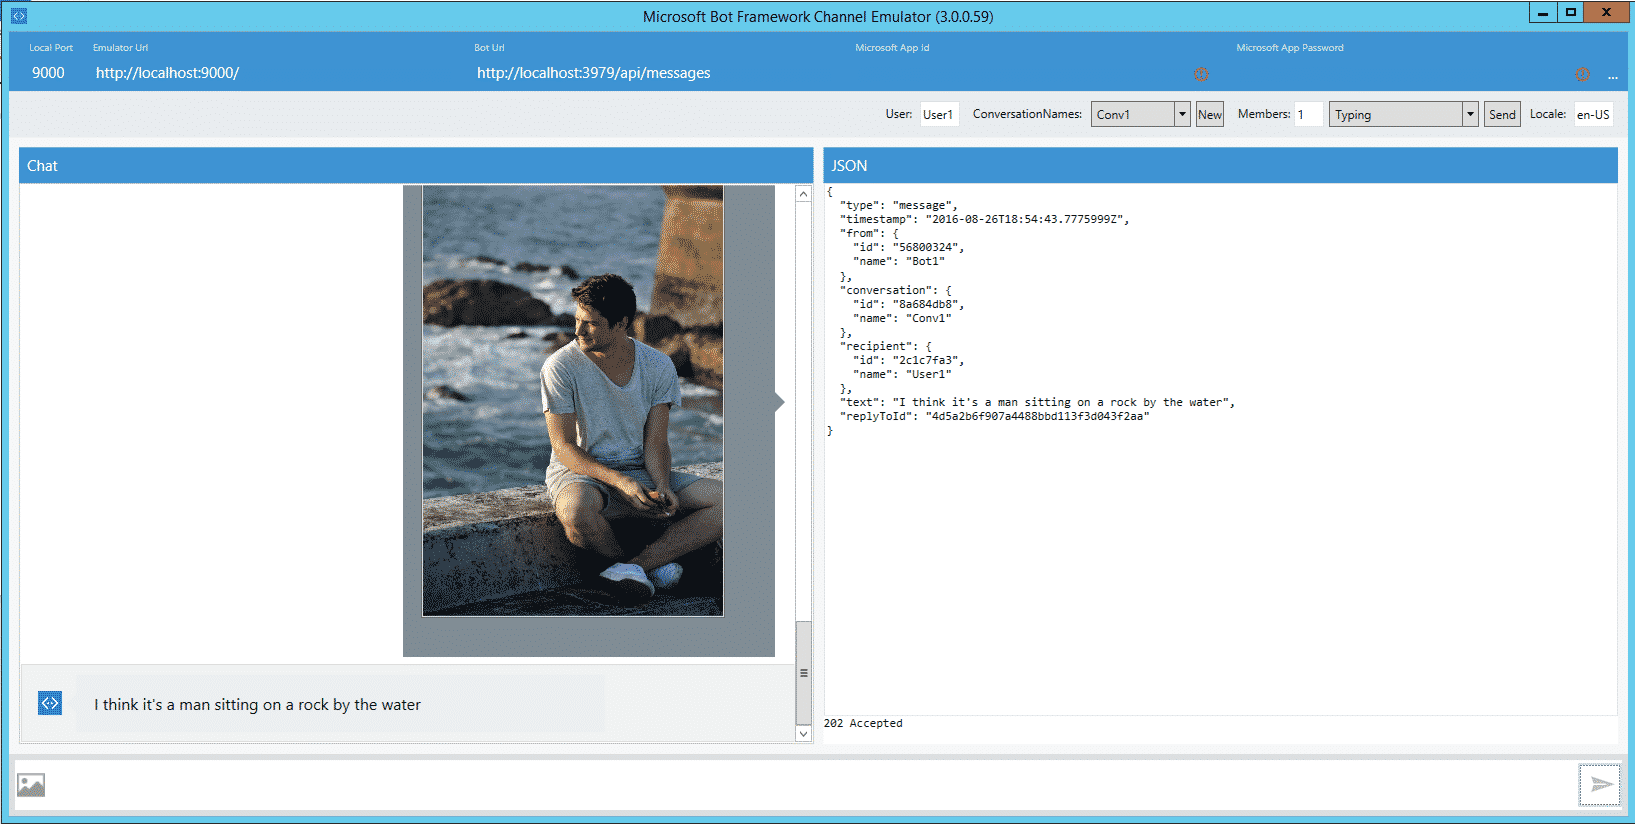
Setup the bot emulator

The emulator gives the possibility to test your bots locally. You can download the emulator here.

Developing AI using .Net

The emulator requires 3 params:

  • The Url for your bot set the localhost:<port> pulled from the last step. You will need to add the path “/api/messages” to your URL when using the Bot Application template;
  • MicrosoftAppId field is NOT required to test bots locally;
  • MicrosoftAppPassword field is NOT required to test bots locally;

Important: you need to run your bot project in Visual Studio, to use the bot emulator.

Setup images recognition (Microsoft cognitive services: Vision)

Microsoft Cognitive Services APIs offer the possibility to implement AI inside our applications. There are different services:  Speech, Language, Knowledge, Vision and Search. This demo uses the Vision service to caption photos sent by users.
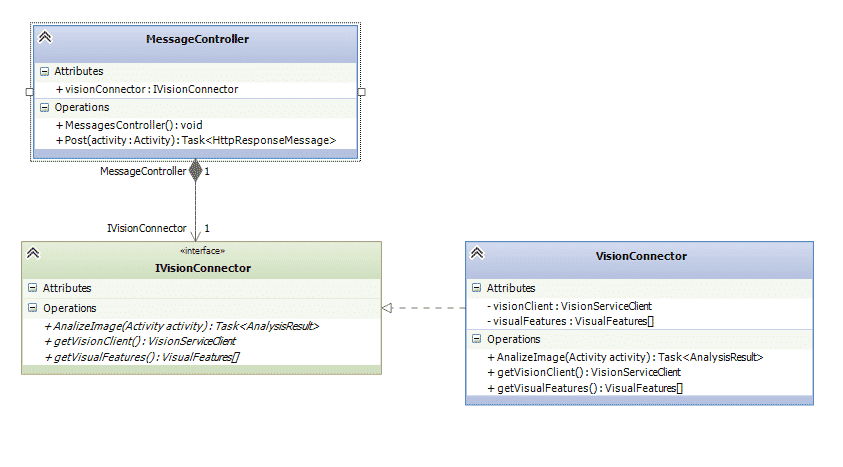
Class schema

Developing artificial intelligence using .Net

Code

Firstly, add the IVisionConnector.cs interface and VisionConnector.cs class to your project:

using Microsoft.Bot.Connector;
using Microsoft.ProjectOxford.Vision;
using Microsoft.ProjectOxford.Vision.Contract;
using System.Threading.Tasks;
namespace Blog.BotApplicationSample.Vision
{
public interface IVisionConnector
{
Task<AnalysisResult> AnalizeImage(Activity activity);
VisualFeature[] getVisualFeatures();
VisionServiceClient getVisionClient();
}
}

The IVisionConnector interface is referenced by MessagesController and describes main methods which are used by VisionConnector. API Token is required by VisionServiceClient to consume APIs. You can get the APIs token here.

using Microsoft.Bot.Connector;
using Microsoft.ProjectOxford.Vision;
using Microsoft.ProjectOxford.Vision.Contract;
using System;
using System.Collections.Generic;
using System.IO;
using System.Linq;
using System.Threading.Tasks;
using System.Web;
namespace Blog.BotApplicationSample.Vision
{
public class VisionConnector : IVisionConnector
{
private VisualFeature[] visualFeatures = new VisualFeature[] {
VisualFeature.Adult, //recognize adult content
VisualFeature.Categories, //recognize image features
VisualFeature.Description //generate image caption
};
private VisionServiceClient visionClient = new VisionServiceClient("<YOUR API KEY HERE> https://www.microsoft.com/cognitive-services/en-us/sign-up");
public async Task<AnalysisResult> AnalizeImage(Activity activity) {
//If the user uploaded an image, read it, and send it to the Vision API
if (activity.Attachments.Any() && activity.Attachments.First().ContentType.Contains("image"))
{
//stores image url (parsed from attachment or message)
string uploadedImageUrl = activity.Attachments.First().ContentUrl; ;
uploadedImageUrl = HttpUtility.UrlDecode(uploadedImageUrl.Substring(uploadedImageUrl.IndexOf("file=") + 5));
using (Stream imageFileStream = File.OpenRead(uploadedImageUrl))
{
try
{
return await this.visionClient.AnalyzeImageAsync(imageFileStream, visualFeatures);
}
catch (Exception e)
{
return null; //on error, reset analysis result to null
}
}
}
//Else, if the user did not upload an image, determine if the message contains a url, and send it to the Vision API
else
{
try
{
return await visionClient.AnalyzeImageAsync(activity.Text, visualFeatures);
}
catch (Exception e)
{
return null; //on error, reset analysis result to null
}
}
}
public VisualFeature[] getVisualFeatures() {
return visualFeatures;
}
public VisionServiceClient getVisionClient()
{
return visionClient;
}
}
}

VisionConnector implements methods to communicate with Microsoft Cognitive API.

Next, go to MessagesController.cs class file and replace the following code:

using System;
using System.Linq;
using System.Net;
using System.Net.Http;
using System.Threading.Tasks;
using System.Web.Http;
using System.Web.Http.Description;
using Microsoft.Bot.Connector;
using Newtonsoft.Json;
using Blog.BotApplicationSample.Vision;
namespace Blog.BotApplicationSample
{
[BotAuthentication]
public class MessagesController : ApiController
{
public IVisionConnector visionConnector;
public MessagesController() {
visionConnector = new VisionConnector();
}
/// <summary>
/// POST: api/Messages
/// Receive a message from a user and reply to it
/// </summary>
public async Task<HttpResponseMessage> Post([FromBody]Activity activity)
{
ConnectorClient connector = new ConnectorClient(new Uri(activity.ServiceUrl));
if (activity.Type == ActivityTypes.Message)
{
var analysisResult =await visionConnector.AnalizeImage(activity);
Activity reply = activity.CreateReply("Did you upload an image? I'm more of a visual person. " +
"Try sending me an image or an image url"); //default reply
if (analysisResult != null)
{
string imageCaption = analysisResult.Description.Captions[0].Text;
reply = activity.CreateReply("I think it's " + imageCaption);
}
await connector.Conversations.ReplyToActivityAsync(reply);
return new HttpResponseMessage(HttpStatusCode.Accepted);
}
else
{
HandleSystemMessage(activity);
}
var response = Request.CreateResponse(HttpStatusCode.OK);
return response;
}
private Activity HandleSystemMessage(Activity message)
{
if (message.Type == ActivityTypes.DeleteUserData)
{
// Implement user deletion here
// If we handle user deletion, return a real message
}
else if (message.Type == ActivityTypes.ConversationUpdate)
{
// Handle conversation state changes, like members being added and removed
// Use Activity.MembersAdded and Activity.MembersRemoved and Activity.Action for info
// Not available in all channels
}
else if (message.Type == ActivityTypes.ContactRelationUpdate)
{
// Handle add/remove from contact lists
// Activity.From + Activity.Action represent what happened
}
else if (message.Type == ActivityTypes.Typing)
{
// Handle knowing tha the user is typing
}
else if (message.Type == ActivityTypes.Ping)
{
}
return null;
}
}
}

MessageController class watches  all incoming images and returns the detected caption.

All together now!

Finally, run your Visual studio project and set the bot URL on Bot emulator:

Developing artificial intelligence using .NET

Final thoughts

It’s very easy developing artificial intelligence using .NET, Microsoft Cognitive Services  and Bot framework .

They let you build cross-platform apps with powerful algorithms using just a few lines of code.

Bot framework  is compatibile with the most famous chats: Facebook, Telegram, Skype and Whatsapp.

The example is available on GitHub.

Cheers 🙂